Tag

how to be organized at work

Raising Your Personal Productivity Bar

By Blog, Resources, Time Management No Comments

For some, fall is a time to review personal and professional goals.


The kids are back in school, summer holidays are over, your company begins its third quarter; whatever it is, this is a time to renew or revisit your goals. And getting back to work not only means getting back into a comfortable work routine, it also means accessing what’s worked in the past and what didn’t work.


Did you know a workspace cluttered with paper is the sign of an environment full of deferred decisions?


It can also signal a disorganized mind that lacks focus or an individual who isn’t as productive as they could be.


Piles of paper and a bulging Inbox can weigh heavy on a person. It can also result in missed deadlines, lost information, late payment fees, and other financial costs you or your company may not even be aware of until its too late.


But hold on!


Before you look around your office and feel overwhelmed by the amount of organizing that needs to be done, remember we’re going to take it one step at a time.


Listen to the pros:

Psychology professor Dr. Gail Matthews has advice for those who put “stop procrastinating” on their list of resolutions. You’ll find that September is the perfect time to heed this advice and re-evaluate where you want to be.


Dr. Matthew’s suggestion for increasing personal productivity is simple: Share your goals with a friend.

Research recently conducted by Dr. Matthews shows that “people who wrote down their goals, shared this information with a friend, and sent weekly updates to that friend were on average 33% more successful in accomplishing their stated goals than those who merely formulated goals.”

If you find you are not satisfied with the way your business success and productivity is headed, here are some suggestions to create more desired results.

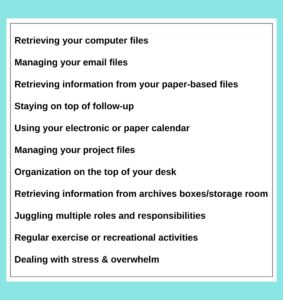
Take our Self-Directed Productivity Quiz:

On a scale of 1-10 how satisfied are you in these areas of productivity and effectiveness (1 being not satisfied and 10 very satisfied):

Ok – What Next?

The next step is to only work on one to three areas at a time. Write down the three biggest obstacles you are currently facing based on your answer above.


Do you desire to have an empty Inbox?

Do you long to stay on top of your follow-up list?

Do you wish you had more time to exercise?

Could you be better at juggling your roles and responsibilities?

Would you like to spend less time looking for files and information?


During this process, your goal is to raise the bar up by just one or two levels.

What possibilities do you now see? These may be new opportunities or a clearer vision of existing ones. Once you get rid of the mental clutter through organization, more possibilities will be revealed.


Your Plan of Action:

Now that you have identified what obstacles are in the way of your productivity, get ready to eliminate each and every one with a plan of action.

Write down your plan of action for dealing with each item.

Next, ask yourself “What is one action I am committed to doing consistently in the next week to raise my level of satisfaction to an eight or higher?” Write down your answer and schedule time on your calendar to do that action.

Just like you would schedule a haircut or doctor appointment, schedule time to work on your action.

For example, if you ranked yourself a 6 in managing your email files, then what would be one action you could take to raise your level of satisfaction to an 8? You might research the internet for articles or tips on managing your email, register for a webinar on organizing your email, read a book, or talk to a team member in your office who you’ve noticed is very effective with managing their emails.


Remember, the key to your personal productivity, is taking action and sticking with it on a consistent basis.

This is where sharing your answers and committing to a time frame with a friend is invaluable. Have your friend help you stay accountable by either having them ask you for a weekly status report, or have them text or nudge you to keep at it.


Thirty to sixty days from now, re-assess your level of productivity by taking the quiz again and you should see a noticeable difference in your level of satisfaction. Another interesting side benefit of implementing one to three actions in certain areas is you’ll notice your level of satisfaction went up in other areas that you weren’t even focusing on.

Now that’s being productive!

Using Outlook Categories When Organizing Microsoft Outlook, organizing computer files, organizing contacts using categories, color code contacts

Using Outlook Categories When Organizing Microsoft Outlook

By Blog, Free Articles, Organizing Microsoft Outlook No Comments

organizing Microsoft OutlookCategories are a way to group certain Contacts together.

Using categories makes it easier to find, sort and filter your Contacts. For example, you receive a new email from someone you want to add to your Contact List. Typically, you would add all their contact information.  I suggest that you take it a step further and select a category for the Contact, like Vendor, Client, Prospect, Advertising, Resource, Family, Personal, etc.  Microsoft Outlook already has a list of categories in the Master Category List.  You can add, change or delete any of these categories to suit your unique situation.

There are a several reasons for categorizing your Contacts when organizing Microsoft Outlook.

Firstly, you can drag and drop an entire category or several categories over to your Inbox and all the email addresses will automatically appear in the To: field of your message.  Make sure you cut and paste these email addresses into the BCC field before you send the email.  This is to comply with privacy laws.  Secondly, it groups and organizes your Contacts for easy retrieval. A group of Contacts can easily be selected for a mail merge.  Categories are also useful for those times when you export your Contacts into other programs

The most important reason to categorize your Contacts is to help you stay on top of your follow-up.  In any business, the fortune is in the follow-up!  Categorizing your Contacts streamlines your marketing and follow-up efforts.  You will also be able to easily sort, filter and print Contacts by one or more categories.  For Example, create a category called “Prospect” and flag it for follow-up on a specific day, or create an appointment from within the Contact and select the date you want to follow up on that valuable lead.  You could also create a Category for different events that you have (a product launch, fundraisers, Christmas party, grand openings, products customers purchase, etc.).  After the event you could sort your Contacts by the Category and show your appreciation by following-up with a thank you card to each person who attended the event.  For more information on follow-up systems, see Chapter 4.  Also, click this link to learn about a follow-system.

Time-Saver Tips

You can assign several categories to one Contact.  Also, when you export your Contacts to other database programs, make sure you export the Category field.  The Category will map over into the new database and save you data entry time.

Three Step Process When Creating Your Initial Categories

1.    Plan your categories on paper first
2.    Create the new Categories in the Master Category List
3.    Assign Contacts to the appropriate category or categories

You may also receive emails that are new leads and it is important that you create a system to follow-up. Whatever your situation, Categories and follow-up is critical to an effective Contact list.  For more information on setting up your Follow-up system go to Chapter 4.

Outlook’s Master Category List comes with a list of default categories that you can use or modify to suit your own needs. Note that items can be assigned to more than one category if needed.

Creating categories

1.    Select Categories from the Edit menu
2.    Click Master Category List
3.    Type a category name in the New category box
4.    Click Add
5.    Follow steps 3 and 4 to create additional categories
6.    Click OK twice

Assigning a category when creating an item

1.    With the item open, click Categories (in an email click Options, Categories)
2.    In the Available categories list, click on the boxes next to the applicable category or categories
3.    Click OK

Assigning a category to an existing item

1.    Select the item
2.    Click Categories on the Edit menu
3.    In the Available categories list, click on the boxes next to the applicable category or categories
4.    Click OK

Taking the time to plan and create your categories while organizing Microsoft Outlook today will save you time and money tomorrow!

Want To Use This Article In Your Newsletter or Website? You have my permission, as long as you include this complete blurb with it: Sherry Borsheim is the Founder of  Simply Productive.  You can visit Sherry, access her free articles archive and download lots of free stuff at https://www.simplyproductive.com. Sherry lives in Vancouver, BC Canada with her husband and they enjoy golfing together.