Tag

how to get organized at home

Small Laundry Room – Big Organization

By Blog, Home Organizing, Simple Living No Comments

Organizing a small laundry room can seem like a pretty big, intimidating task. But with the right strategies and organizing tools in your belt, you can easily transform it into an efficient, functional space!


Being realistic, organizing a small space takes a lot of thought. There are many aspects to consider when setting up any type of organizing system in a small area.


There’s the challenge of physically fitting all your items, plus making sure they’re all actually accessible, and on top of that, it’s got to look nice too! With a bit of forethought, organizing a small laundry room can be a lot of fun and very rewarding when you put in the right organizing systems.


Let’s get right into these valuable tips and tricks for decluttering, utilizing vertical space, and creating a well-organized laundry room.


And who knows? You might find yourself enjoying your next laundry day! 😉


Organizing A Small Laundry Room


Step 1: Clear the Clutter

The first step in organizing any area is to declutter the space. Remove anything that you don’t need to store here, including; mismatched socks, ragged towels, miscellaneous items that have accumulated over time, and anything else that doesn’t belong in the laundry room.


You’ll want to make sure that you actually get rid of these things. Meaning donating, recycling, or throwing out what you no longer want. It’s important to completely remove these things because if you don’t, there’s a good chance they’ll migrate right back to where you removed them from. By creating a clean slate, you’ll have a better sense of the available space and can start organizing effectively.


The next thing you’ll need to do is assess your vertical space. For this, I’m going to let you in on how I have maximized literally every square inch of my own small laundry room!


Step 2: Embrace Vertical Space

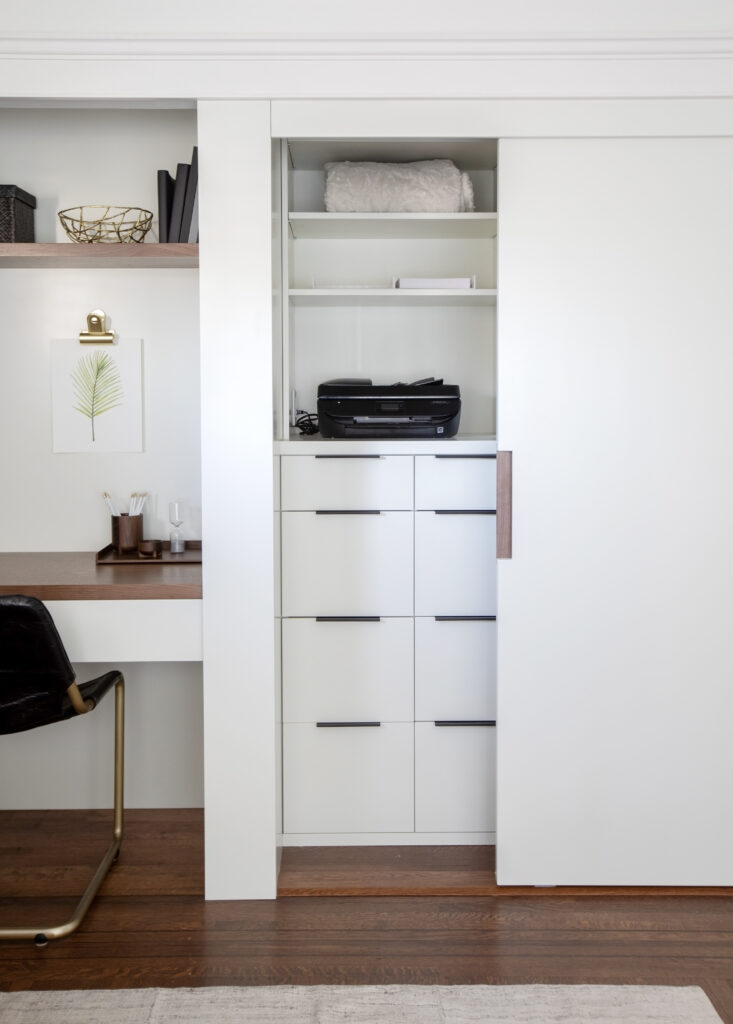
One of the most effective ways to maximize a small laundry room is by utilizing vertical space. I’m a big fan of storage units with adjustable shelving. I can change them as things change over time, and it allows me to use all this vertical space in the closet that might otherwise be wasted.


When you’re buying products for your laundry room, make sure you purchase items that will realistically fit. For example, we have a vacuum in here. One thing I had to consider when vacuum shopping was that there’s no outlet available in the area, so I can’t pick one that requires a wall plug-in. Plus it has to be a certain size for the designated space. So when I’m looking at buying new things, I ask myself, “Is that going to fit in my space?”


If your washer and dryer are side by side, you could also install a shelf above them to take advantage of otherwise unused space. This shelf can hold laundry essentials or even decorative items to add a touch of style to the room.


I like to keep some useful tools for the second level of my home in my small laundry room as well, so I don’t have to make as many trips around the house! In this small tool drawer, I store; batteries, picture-hanging hooks, light bulbs, felt pads for furniture legs, a hammer, a small level, a screwdriver, a flashlight, extension cords, a measuring tape, scissors, a pen, and an exacto knife. Our larger tools are stored in the garage, but these are things that I wanted to have easy access to.


In another section are my extra supplies and bulk items. Things like toilet paper, soap, bulk cleaning products, vacuum parts, garbage bags, plastic zip bags (for travel), extra laundry detergent, extra dryer sheets, clothing hangers, and a small sewing kit.


Step 3: Choose Fitting Products

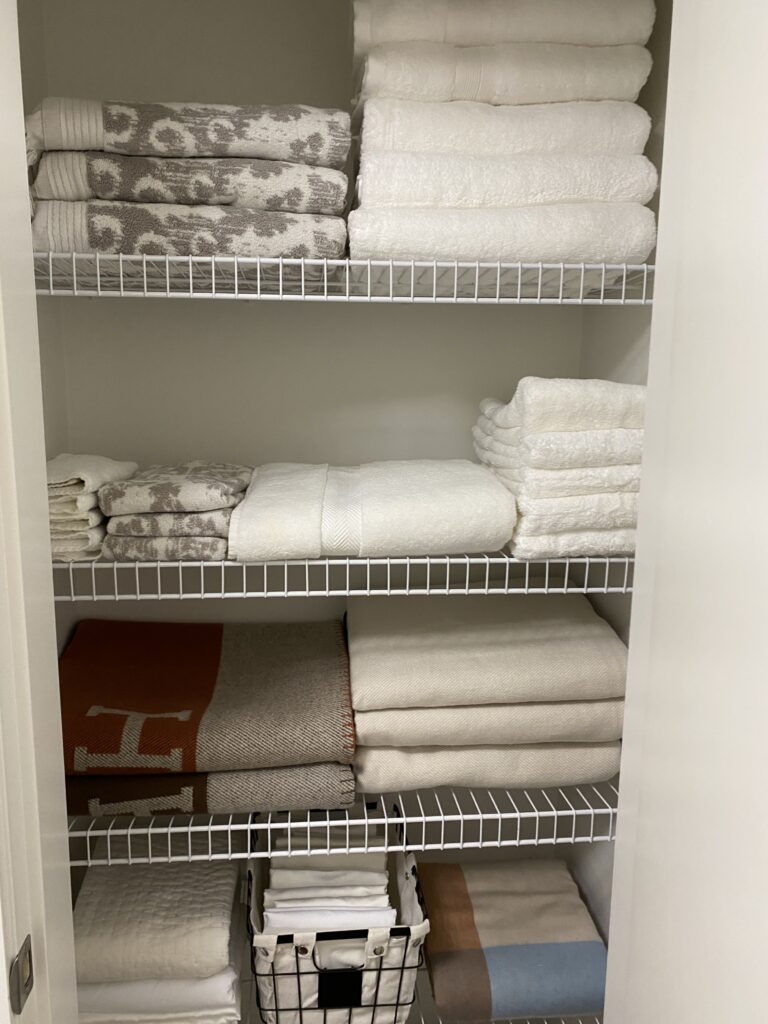
When purchasing storage containers and products for your small laundry room, always, always, ALWAYS keep the available space in mind! Measure the dimensions of your closet, shelves, and drawers BEFORE you shop for anything to ensure that everything you buy will actually fit into the space. Clear containers work best in these spaces so you can easily identify the contents. And don’t forget to label them for quick access!


Step 4: Placement of Items

Consider the placement of items to enhance convenience and ease of flow in your small laundry room. Position your laundry detergent at a comfortable height. Make sure you won’t have to move anything out of the way to reach it, and that it’s secure enough that it won’t tip or drip. Use a protective liner underneath to prevent any accidental drips from staining your shelving.


Having a small folding step on hand makes a world of a difference, too! Even if you’re on the taller side, there are usually a couple of cabinets or shelves that are hard to open from tippy toes. And when we can’t reach the top shelf, things are simply not going to get put away. The brand I prefer for these is Kickerland, and their step stools come in white, black, or grey. These are very sturdy and very slim to store!


Step 5: Establish a Laundry Routine

Creating an efficient laundry routine can help keep your small laundry room organized and prevent clutter from building up. Set aside specific days for laundry and do your best to stick to that schedule. Set a goal to stay consistent for a month. Then two months. Then six months! Once you’ve developed a consistent habit of doing laundry, an organized small laundry room will soon come as a side effect.


You really can avoid overwhelming piles and maintain a tidier space by doing laundry more regularly!

✨ FREE DOWNLOAD ✨

Laundry Planner

Keep on top of laundry without the overwhelm!

Download Now →


In Conclusion…

By implementing these simple strategies in your small laundry room, you’ll be amazed at how much much bigger it will feel! A well-organized space not only makes your laundry routine more efficient but also enhances the overall functionality and aesthetics of the room.


When you can easily access, see, and reach everything you need, life gets a whole lot easier. Since laundry is going to be a part of our weekly schedule for the rest of our lives, this space should be one of the most efficient, am I right?! You got this!


Enjoy your clutter-free, maximized laundry area!


Like this article?

You’ll love this one👇🏼

50 Things To Declutter Right Now

Don’t know where to start decluttering?


Sign up for my free newsletter so I can send you the best organizing tips and strategies each week.

(and some freebies, too!)

Sign up here →

5 Decluttering Projects to Tidy Your Spaces

By Blog, Home Organizing, Quick Organizing Tips No Comments

Quick decluttering projects are perfect solutions to create a fresh, organized vibe in your living and entertainment spaces for the summer!


In preparation for the busy season, start taking advantage of the longer daylight hours now. Tackle those forgotten-about corners to create some space for sunlight in your home today!


The good news is, you don’t need to set aside an entire weekend or trade hours of family fun for a more organized home. Today we’re giving you 5 simple 30-minute organizing projects that will transform key areas of your living space and teach you how to declutter your home.


Let’s get to it so you can enjoy your newfound sense of calm today!


✨ FREE DOWNLOAD ✨

The Home Laundry Planner

Keep on top of laundry without the overwhelm!

Download Now →


Decluttering Projects to Tidy Your Spaces

1 – Tidy the Desk Space

Your desk is the hub of productivity, a very important space! But it can also quickly accumulate a chaos of papers, office supplies, sticky notes, cluttered decor, and other miscellaneous items. Here’s how to declutter your home quickly in this area: spend just 30 minutes decluttering those unnecessary things and rearranging the surface of your desk. It’s that easy!

Work to create a space that offers you focus and creativity. Clearing your physical space helps in clearing your mental space, so try to store away as much as you can in drawers, cabinets, binders, and file folders. Be ruthless when decluttering papersdigitize what you can, file away what you need, and recycle what you don’t. You’ll be amazed at how much more efficient and inspired you feel once everything has a designated place!

2 – Clear the Kitchen Counters

Kitchen counters tend to attract clutter like magnets. They often become the dumping ground for keys, sunglasses, junk mail, dusty appliances, to-do lists, kids’ toys, and other odds and ends. Spend half an hour today to declutter everything on your kitchen counters. Reevaluate the items you regularly keep on your counters too. Ask yourself questions like, when was the last time I used this French coffee press? Do I use my bulky KitchenAid mixer often enough to permanently store it on the counter? Reclaim your meal-prepping space to one of beauty and order.

If you find yourself regularly dropping mail on one end of the counter, put a small basket there instead. Now that you know how to declutter your home, you’ll have a space to catch those odds and ends so they don’t take over your entire counter!

3 – Calm the Bedside Table Nightstand

Your bedside table should be a sanctuary for relaxation and rejuvenation, not a cluttered mess. If you don’t already have one, think about a bedtime routine you’d like to implement. What does it involve? Maybe you like to use a lavender spray on your pillow, journal or read a book, listen to relaxing music, and sleep with an eye mask, for example. Now that we know the contents you’ll be keeping close by, we can begin to organize the bedside table. Take just 30 minutes to declutter anything you don’t need, then organize what you do.

In our example that may look like a bottle of lavender spray, a pen and journal, reading glasses, your current reading material, earbuds, and a sleeping mask. Spend some time thinking about the necessities you want to have now so you can unwind before sleep and wake up to a calm and clutter-free morning, every day!

4 – Pare Down in the Linen Closet

Combat the embarrassment of not being able to find a matching sheet set for your guests (or even for your own bed)! Today, dedicate 30 minutes to decluttering and organizing your linen closet. Chuck out any linens with stains, rips, or worn-out spots. If you have pieces that don’t match, donate them. Ensure that everything you choose to keep is neatly folded and easy to access.

Once you’re comfortable with how to declutter your home here, an extra level of organization here could be sorting the linens one step further. This can be done by size (King, Queen, Double, Twin, etc.) and type (sheet sets with pillowcases, duvet covers, bath towels, etc.). Then label the shelves according to which bedroom they belong in or by bed size. Resetting your home every week when laundry is done will soon be a breeze!

5 – Lighten the Freezer Load

How many hot summer afternoons have you gone to defrost something for dinner, only to discover the items left in your freezer are unidentifiable? Save yourself last-minute grocery store trips and wasted money by decluttering your freezer in advance!

Invest just half an hour in organizing your freezer space(s) today. Sort through everything, discarding expired foods and setting aside or tossing unidentifiable ones. Then think about how a retrieval system might look for you. Make sure that it would allow you to easily locate and pull out your frozen items. Use bins to contain items and label them in categories like fruits, vegetables, chicken, beef, seafood, bread, and frozen treats.

Goodbye scrambled dinner plans, hello meal prep haven!

By learning how to declutter your home with these 5 quick decluttering projects, you can make significant changes to the way your home functions for you! Even decluttering just 3 of these spaces will lead you to a more harmonious living space.


Just in time for summer!


Grab your timer, put on some motivating tunes, and get started on bringing order and tranquility back into your home. One 30-minute project at a time!


Which space will you tackle first? Comment below!


Like this article?

You’ll love this one👇🏼

10 Day Decluttering Challenge

Don’t know where to start decluttering?


Sign up for my free newsletter so I can send you the best organizing tips and strategies each week.

(and some freebies, too!)

Sign up here →

Organizing The Perfect Summer Picnic

By Blog, Checklists, Inspiration No Comments

Organizing the perfect summer picnic is a wonderful way to combine spending quality time with loved ones and enjoying the great outdoors!


Whether you’re planning a romantic date night or a fun family weekend, arranging a picnic is sure to create beautiful memories. In this article, I’ll be covering everything you need to know about organizing the perfect summer picnic; from choosing the ideal location, packing essential supplies, and planning for any type of unexpected event.


And remember to set a great example for your children and others. A successful picnic not only involves enjoying the moment but also taking responsibility for cleaning up afterward!


✨ FREE DOWNLOAD ✨

Summer First Aid Kit Checklist

Be confident in any summer emergency!

Download Now →


Organizing The Perfect Summer Picnic


Planning the Location


Scout and Pick The Perfect Spot:

Finding the perfect picnic spot is important for setting the right vibe! As well as making sure that your just-in-case weather preparations will work as desired if you need to use them.


Consider a location with picturesque views if you’d like to take photos, such as a grassy park, beach, or scenic lookout point. Take some time to scout the area in advance and choose a spot that offers enough space for everyone to relax comfortably. In some large, busy cities it can even be required to book your spot and required parking in advance, so make sure to check your favorite park’s requirements well before planning anything else! If kids are coming along, make sure there will be an area for them to play after the meal as well!


Check Out Parking Options:

Before the big day, research parking options near your chosen picnic spot. Ensuring convenient parking will save you from any unnecessary hassle or stress on the day of the event and allow you to set up your picnic with ample time. If you’re inviting guests who will be meeting you there, forward any necessary parking information to them as well.


Pinpoint the Nearest Public Bathroom:

It’s always wise to be prepared, especially if you’ll be bringing little ones along. Since nobody likes a last-minute scramble while hopping from foot to foot, make sure you have at least one option in mind before the big day. Research where the nearest public bathrooms are so you can provide directions for guests during your picnic.


Consider the Area’s Popularity:

This step is important if you want to avoid the disappointment of arriving and finding out your perfect spot has been filled by others! Find out how busy the area typically is on the day you’re planning your picnic. Google Maps can be a good reference if you are going to be at a public park as they have stats of when the busiest days and times are. Either way, plan to arrive early so you can secure your desired spot and not have to set up in a rush.


Supplies


Seating and Preparation:

Ensure you have comfortable seating by bringing along an outdoor blanket with a waterproof bottom. Some picnickers like to use a mini folding table or tray for a bit more table height and convenience. Additionally, you may want to bring wide, firm pillows for those who prefer sitting above the ground or even picnic chairs if needed.


Another way to spruce up the ambiance is to bring a portable speaker and make a curated picnic playlist in advance!


Picnic Basket Necessities:

Pack a well-equipped picnic basket or tote bag to store all your picnic necessities. To keep your food in its best condition until the event starts, bring ice packs and even a few extra in case you will need to keep some leftovers cool on the way back.


Think about including a camera to capture special moments, sunscreen to protect your skin, bug repellent or a citronella candle to ward off unwanted bug guests, and table decorations to create the imagined atmosphere. To make sure the fun doesn’t stop after eating, don’t forget to bring some cards, a board game, or a light outdoor activity to enjoy after the meal!


Serving it Up:

Gather all the necessary serving supplies well in advance. There’s nothing worse than arriving late because you were looking for something last-minute!


This includes plates, utensils for eating and serving, napkins, cups, and plenty of water. Bring a bottle opener if you plan on enjoying some beverages that will require one. Pack a cutting board and a sharp knife for any on-site food preparations. Additionally, bring salt, pepper, and any other desired condiments. This is a great time to use those extra condiment packets from takeout places I know we’ve all been “saving!” 😉


Cleaning Essentials:

Prepare for easy cleanup by bringing paper towels, wet wipes, some dishtowels (also good for packing plates and breakable items during transit), and extra food containers. Ziploc bags are also handy for packing up dirty utensils or storing leftovers. Pack a few trash and recycling bags to ensure you’re walking away from a clean space afterward. Consider bringing reusable bags to collect and transport your picnic supplies if you plan to bring a lot of items for setup.


More Tips


Keep it Fresh:

To keep your salads and sandwiches fresh, pack any wet dressings or condiments separately in small jars. Add them to your food once you’ve arrived at the planned picnic spot. This prevents the ingredients from getting soggy during transport!


Weather Preparedness:

Always be prepared for unexpected weather conditions when picnicking. Bring blanket weights or other wind deterrents to secure your blanket. If the sun is scorching or there is a possibility of rain, pick a spot with shade from trees, bring a gazebo that’s quick to set up and take down, a pop-up tent, or some large umbrellas.


Food Considerations:

Plan your picnic menu in advance, considering any allergies, dietary preferences (vegetarian/vegan), or a specific theme. Think about the ingredients, required preparation time, sealed containers to protect from bugs, and ice coolers for perishable items. If you’re having a potluck-style picnic, use Google Keep’s note feature to share with your guests so everyone is on the same page with what to bring! Pack a variety of drinks for guests to quench their thirst!


A successful picnic involves not only having a fun day with loved ones but also taking responsibility for leaving the environment as you found it (or even better!). Once you’ve finished your meal, be sure to clean up after yourselves. Dispose of trash properly and ensure recyclable items are separated as needed.


By practicing good picnic etiquette, you contribute to preserving the beauty of nature and ensure that future picnickers can enjoy the same great experience! So, gather your loved ones, follow this guide, and embark on an unforgettable picnic adventure!


Do you have a favorite picnicking spot? Comment below!


Like this article?

You’ll love this one👇🏼

Essentials for Your Summer First Aid Kit

Don’t know where to start decluttering?


Sign up for my free newsletter so I can send you the best organizing tips and strategies each week.

(and some freebies, too!)

Sign up here →